 Save
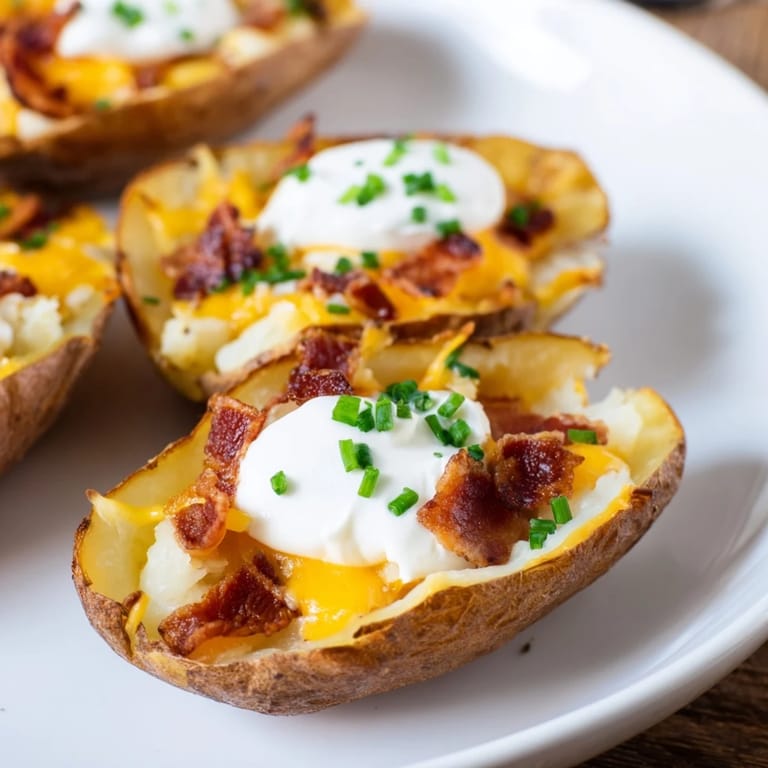
Save There's something about a loaded potato skin that stops conversation mid-sentence. I learned this at a neighborhood potluck years ago when I brought a tray of these crispy, cheese-laden boats and watched them disappear faster than anything else on the table. The moment someone bit into one—that perfect crunch giving way to creamy cheese and smoky bacon—I knew I'd stumbled onto something that would become my go-to move for any gathering. It's not fancy, but it doesn't need to be. These skins have a way of making everyone feel a little more at home.
I remember standing in my kitchen on a cold November evening, prepping these for my sister's book club. She'd mentioned offhand that she hoped someone would bring "real food" instead of store-bought dips, so naturally I took that as a personal challenge. When the first person tried one and their eyes widened just slightly—that micro-moment of surprise and delight—I felt like I'd cracked some secret code. From that night on, these became my signature move, the thing people started requesting by name.
Ingredients
- Large russet potatoes (4): The thicker skin holds up to the high heat without splitting, and the starchy interior is perfect for scooping out. Don't use waxy potatoes like reds or fingerlings—they'll just frustrate you.
- Olive oil (2 tablespoons, plus more for brushing): This is what gives you that shattering crisp on the outside. Regular oil works, but the little bit of character in olive oil makes a noticeable difference.
- Kosher salt (1/2 teaspoon): Season the potatoes generously before baking so the flavor soaks in, not just sits on top.
- Freshly ground black pepper (1/4 teaspoon): Fresh matters here because you can taste the subtle difference against the richness of everything else.
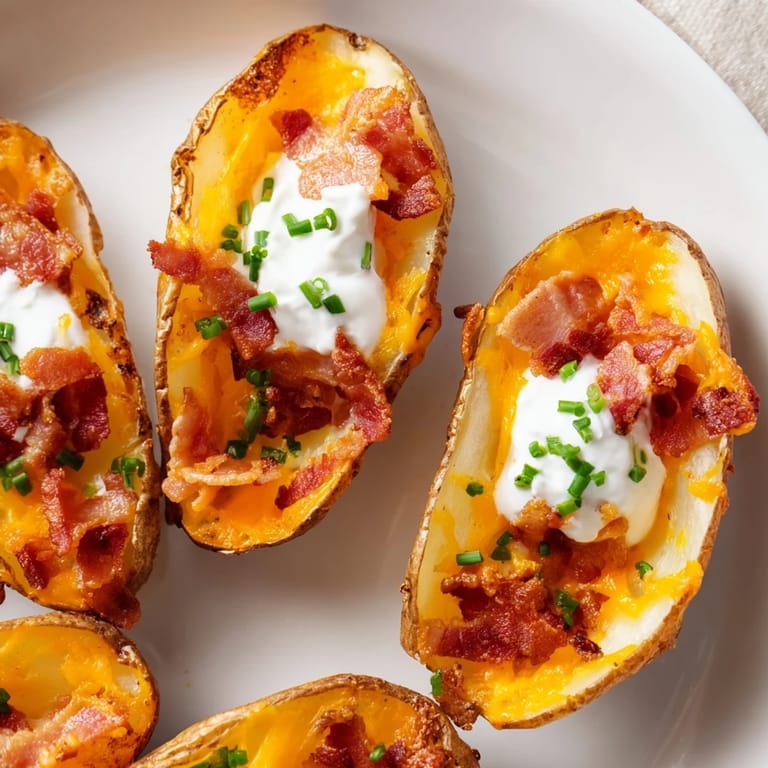
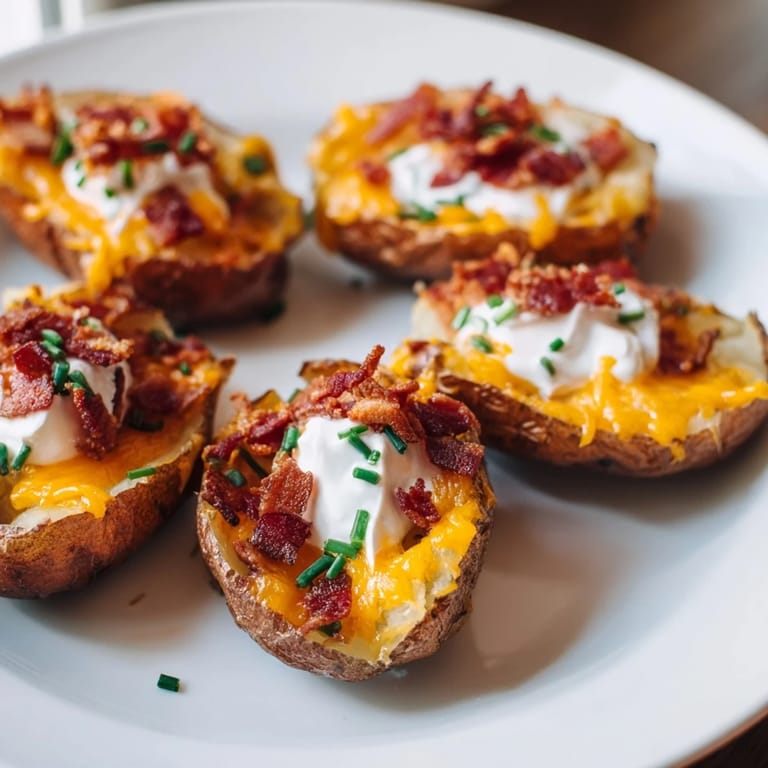
- Sharp cheddar cheese (1 cup shredded): The sharpness cuts through the fat beautifully. Mild cheddar tastes almost flat by comparison, and pre-shredded has anti-caking agents that make it less creamy when it melts.
- Bacon (4 strips, cooked and crumbled): Cook it until it's properly crispy and breaks into small shards rather than chewy pieces. Save a tiny bit of the rendered fat if you're feeling adventurous.
- Sour cream (1/2 cup): This is the cooling, tangy counterbalance. Full-fat tastes noticeably better than the thin versions.
- Fresh chives (2 tablespoons chopped): They add a whisper of onion and a pop of green that changes the whole appearance and taste.
Tired of Takeout? 🥡
Get 10 meals you can make faster than delivery arrives. Seriously.
One email. No spam. Unsubscribe anytime.
Instructions
- Start with hot potatoes:
- Preheat your oven to 400°F and line a baking sheet with parchment or foil—this prevents sticking and makes cleanup almost shameful in how easy it becomes. Give each potato several fork pokes so steam can escape evenly rather than turning them into little time bombs.
- Build the foundation:
- Rub the whole potato with olive oil, salt, and pepper, making sure to get into all those little poke holes. Bake for 40–45 minutes until the skin is starting to blister slightly and a fork slides through the flesh without resistance.
- Cool and halve:
- Let them rest for 10 minutes after coming out—this prevents you from burning your fingers and gives the inside time to set up slightly so it doesn't crumble. Cut each one in half lengthwise with a sharp knife, using a gentle sawing motion rather than hacking.
- Create the vessel:
- Scoop out the potato insides carefully, leaving about a quarter-inch shell clinging to the skin. This is where patience pays off—rush it and you'll punch a hole in your shell. Save that scooped flesh for mashed potatoes or hash browns later.
- Crisp the skins:
- Crank the oven up to 450°F, brush the inside of each skin lightly with more olive oil, and bake for 10 minutes so the inside surface becomes almost translucent and shatterable. You're looking for that moment when the skin develops a faint golden hue and sounds hollow when you tap it.
- Layer the goodness:
- Remove from the oven, quickly distribute the shredded cheese and crumbled bacon evenly across all the skins, and return them for another 5–7 minutes until the cheese is bubbling at the edges and starting to brown slightly in spots. Don't walk away here—ovens vary and you want to catch it at peak melted, not burnt.
- Finish with finesse:
- Top each warm skin with a generous dollop of sour cream so it starts to melt into the creases, scatter chives over top, and serve immediately while everything is still hot and the cheese is still moving inside.
 Save
Save One time I made these for a Super Bowl party and forgot to bring the sour cream topping. I improvised with a cream cheese mixture that someone had brought, and honestly, it was better than my original plan—sometimes the happy accidents are worth more than the careful preparation. That's the beautiful thing about this recipe: once you understand how the pieces work together, you're free to improvise.
Cheese Options Worth Exploring
Sharp cheddar is the classic, but I've had extraordinary luck with Monterey Jack, which melts almost too easily and creates this glossy, uniform finish. Pepper Jack brings heat without overwhelming everything else, and a blend of cheddar and gruyere adds an almost nutty complexity that makes people pause mid-bite and try to identify what makes it taste different. Don't be afraid to experiment once you've made these the traditional way at least once—that's when you'll understand what each cheese brings to the table.
Timing and Temperature Matter More Than You Think
The oven temperature bump from 400 to 450°F isn't just a suggestion—that difference is what separates a limp appetizer from something with character. Room-temperature ingredients go in fine, but having your cheese and bacon at hand and ready to go before the skins come out of the oven is the difference between graceful plating and panic-station. The window between perfect and overdone is maybe three minutes, so set a timer and trust it more than your eyes.
Making Them Ahead and Storing
You can prep these through the scooping stage and refrigerate them for up to a day, which means most of your work happens when you actually have time and headspace. The skins and insides can be assembled and topped with cheese and bacon, then frozen in an airtight container for up to a month—just add 5–10 minutes to the final bake time straight from the freezer. The sour cream and chives should always be added right before serving or they turn into a weeping, separated mess.
- Make the bacon the morning of if you want, and keep it in a paper towel-lined container so it stays crisp longer.
- If you're reheating pre-made skins, a 350°F oven for about 12 minutes will warm them through without overcrisping the cheese.
- The leftover scooped potato flesh is genuinely delicious in a hash with some of the rendered bacon fat, so don't let it go to waste.
 Save
Save These little boats have taught me that simple food done with attention tastes better than complicated food done distracted. They're the kind of thing that brings people back, not because they're rare or difficult, but because they hit every note you didn't know you were hungry for.
Recipe FAQ Section
- → How do I make the potato skins crispy?
Brush the potato shells lightly with olive oil and bake at a high temperature to crisp the edges before adding the filling.
- → Can I substitute the bacon in this dish?
Yes, you can use plant-based bacon alternatives or omit bacon for a vegetarian option.
- → What cheeses work well as a filling?
Sharp cheddar is classic, but Monterey Jack, mozzarella, or pepper jack can add different flavor notes.
- → How do I prepare the potatoes before baking?
Scrub russet potatoes, pierce them with a fork, rub with olive oil, and season with salt and pepper before baking.
- → What sides or drinks pair well with these loaded potato skins?
Serve alongside salsa or guacamole, and pair with a crisp white wine or American pale ale for balance.